Snow Workout!
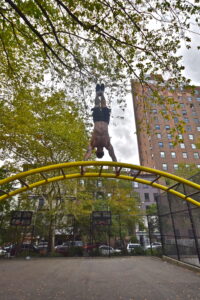
 NYC just got hit with the biggest snowstorm we’ve had in over a decade, but that didn’t stop me from working out at Tompkins Square Park yesterday morning.
In fact, the snow made my workout a lot more fun!
In addition to my usual regimen of pull-ups, muscle-ups and dips, I also did some parkour training. After all, parkour is about overcoming obstacles and a blizzard is just another obstacle to work around!
Snow Excuses
If you’re serious about getting in shape or improving your fitness, there is no reason that you can’t make time for a workout no matter what else is going on. Even if you have to fit in a quick at-home workout with no equipment, you can always dedicate at least a few minutes a day to improving your body.
I’m not saying you have to go out in a blizzard in order to get some exercise, but if you do, make sure to dress warm and layer your clothing. Once you get moving out there, you might be surprised how fun and invigorating cold weather workouts can actually be!
Watch the video below for more:
No Year's Resolutions
 I’m not making any New Year’s resolutions for 2011 and you shouldn’t either. No, we’re not already perfect, I’m simply taking issue with New Year’s resolutions as a concept.
Why They Don’t Work
Most resolutions fall into one of two categories, they’re either overly vague (I’m going to get fit in 2011!) or unrealistically rigid (I’m cutting out all grains and simple sugars for 2011!). These types of resolutions are problematic because they don’t hold you accountable and/or they set you up to fail (which can sometimes be a good thing, but not in this case).
Even “better” resolutions (I’m going to exercise at least three times a week in 2011!) are still useless. Why? Because the calendar is just something WE MADE UP.
We made it up so we can know to meet at a certain time on a certain day and keep track of history to the best of our abilities (and it’s very helpful for those things) but it’s not real. Days and months and years are based on the actual cycle of the planets and stars, yes, but we made up the details.
What You Can Do
Every day is just a day, but it’s also a new opportunity, regardless of whether it’s January 1st or December 27th. It doesn’t make a difference when you start making changes in your life. Your body reacts to the signals you give it every single day, so stop waiting for things to fall into place and start taking action today.
For those of you who may be new to fitness, remember to ease in slowly and be patient. Those of us working out every day and/or following healthy eating plans didn’t make drastic changes overnight.
Setting idealistic (unrealistic) goals is a waste of time. Focus on the process and take it step by step instead of looking ahead an entire year. The next 365 days will likely go by even quicker than the last, but if you set your sights on taking it one day at a time, you may be surprised by what the future brings.
The Dragon Flag
Savvy fitness enthusiasts know that doing endless amounts of crunches isn’t the smartest way to build a strong midsection. Planks and side planks are the most fundamental exercises to develop your core, but if you want to work toward advanced exercises like levers and human flags, the dragon flag can help you get there.
Though best known as a trademark move of legendary martial artist Bruce Lee, the dragon flag has become a popular training tool amongst anyone who is serious about calisthenics and bodyweight training.
A dragon flag is typically performed lying face-up on a bench or on the ground with your hands grasping a sturdy object behind your head for support. From here, the objective is to lift your entire body up in a straight line, stacking it vertically over your shoulders in the top position.
Protect Ya Neck
When performing a dragon flag, focus on using your abs, lower back and glutes to control the movement. Your hands are there for support, but don’t pull the bench into the back of your neck! Instead, use your core strength to roll up onto your shoulders.
Just like learning to do a pull-up, start by practicing the negative (lowering) phase of the dragon flag. Once you get confident with negatives, try doing a static hold at the bottom with your body hovering an inch or two over the bench. When you can hold this position for 2 or 3 seconds, you’re ready to start working on full dragon flags.
While a dragon flag technically requires you to maintain a straight line from your shoulders to your feet, it can be helpful to practice a modified version where you allow your hips to bend. Don’t be afraid to experiment with different progressions and variations on your way to mastering this exercise.
The Elusive Freestanding Handstand
If you aim to master your bodyweight, the freestanding handstand is an essential skill. More than developing any one area, the freestanding handstand will help you learn to use your muscles together, allowing your entire body to function as a single unit. Developing this ability is important as you progress towards more difficult bodyweight exercises like levers and the human flag.
Before attempting a freestanding handstand, I recommend getting comfortable with simpler inversions like headstands and handstands against a wall. From there, move on to practicing basic hand balances like the crow pose.
Off The Wall
The freestanding handstand can be intimidating because there is nothing to catch you if you fall. You must take a leap of faith and go in with confidence that your body will know what to do if you tip over. If you’re having a hard time getting over your nerves, it can help to have a spotter. I also recommend practicing on a soft surface like grass or rubber.
While a freestanding handstand can be a challenging shoulder and arm workout when held for long enough, the balance is typically the most difficult part to learn. It takes a lot of time to find the “sweet spot” between over-balancing (tipping over) or under-balancing (falling back to your feet).
Unlike your foot, which was made for standing, your hand doesn’t have a true heel, so it’s best to put slightly more weight in your fingers than in your palms when balancing on them. If you are a tiny bit over-balanced, you can stay up by pressing your fingers into the ground. When you’re under-balanced, there is less you can do to keep from coming down.
A Tale of Two Handstands
In modern gymnastics, handstands are performed with a perfectly straight line from top to bottom. For this reason, a lot of people will tell you that arching your back during a handstand is bad form. In my experience, however, it is helpful to allow your back to arch while you are learning to find the balance. In time, you can work on reaching your legs upward, pressing into the floor and tightening your abs, lower back and glutes to achieve an aesthetically pleasing straight line from head to toe (or hands to toe as the case may be).
Practice, Practice, Practice
Transitioning from a handstand against a wall to a freestanding handstand is a challenging and potentially discouraging process. I was terrible at hand balancing when I started out, but I’ve been practicing for a while now. For me, the key has been consistency; I rarely miss a day of practice, even if it’s just a couple of minutes at the end of a workout. Some days it comes harder than others, but when I fall, I just get up and try again.
Using Kettlebells as Parallettes
 Editor’s Note: This is a guest post by Timothy Bell, PTS.
Kettlebells – we love lifting them, we love flipping them, some of us even love throwing them around! But did you know that you can get a workout without even picking them up off the floor?
Parallettes are low parallel bars used by gymnasts to practice static holds such as L-sits and training the planche. Not all of us have access to a set of parallettes, but fortunately a pair of kettlebells makes a great substitute.
Due to its fat, heavy base and raised handle, the design of the kettlebell makes it a suitable replacement for parallettes. The kettlebell’s height from the floor allows for ample space to pull your legs through when transitioning between the plache and L-sit, as well as going deep with handstand push-ups. When using kettlebells for parallette work you’ll want to choose two kettlebells of the same weight. The heavier the kettlebell, the stronger the base, and therefore the more stable it will be for your training. To reduce the risk of tipping over, I recommend using 50 lb. bells or heavier.
Parallette Practice
Note my use of the word “practice” when talking about parallette or any gymnastics training for that matter. In my experience, training both myself and my clientele, it is best to approach your parallette training as a practice rather than a workout in itself. There’s a few ways to put this concept into action. You could simply place your parallette training at the beginning or end of your workout, performing 5-7 sets of either L-sits, tucked planche holds, handstands, or a combination of the three. Putting them at the beginning allows you to take advantage of your full strength before you are fatigued from other execises. Doing them at the end forces your body to work very hard in an already weakened state, which will help you perform at a higher level next time you’re fresh and warmed up.
 Another approach is to practice these techniques throughout the day, doing a few sets in the morning, and a few more later on (what Pavel Tsatsouline refers to as “greasing the groove”). This can even be done on rest days as a form of active recovery. Practice these basic holds daily, conquer them, and then move onto more advanced versions of each. There are endless variations you can use to strengthen yourself from head to toe.
Timothy Bell is a heath/fitness educator, founder of Jungle Fit Personal Training, and author of the Jungle Fit Body Weight Solution. For more information on Timothy Bell and Jungle Fit, visit www.Jungle-Fit.com
Nothing to Fear
 While running down a flight of stairs trying to catch a train, I was recently made aware of a phenomenon that prevents many of us from reaching our potential. At the top of the stairs I could not run quickly, not because it was crowded, but because my body was afraid of mis-stepping.
When your body senses the risk of danger to be higher, skills that would normally be performed with no hesitation will suddenly cause nervousness. This is essentially why a fear of heights can be paralyzing for some.
If you’ve ever stood on the balcony of a tall building with a relatively low railing, you might have felt tentative approaching the edge. While you would never worry about falling over a low fence that was on level ground, as soon as that same scenario is 20 or 50 feet in the air, your perspective can change.
Nature or Nurture?
This fear of heights is likely an evolutionary defense mechanism built into humans to prevent us from falling, but since childhood, most of us have also been told by parents and teachers not to jump, climb or hang from things that are high up, so it’s hard to determine where to draw the line between intuition and conditioned behavior.
Whatever the reason for it, our fear holds us back more than it helps us. I’m not saying to disregard what your intuition is telling you, but rather to gradually push the limits back.
Face Your Fear
To reprogram yourself to move beyond this performance inhibiting behavior, you must start slowly. Go to a park and try doing a precision jump on ground level. Just a long jump with both feet taking off together and landing together. No running start. Now count how many feet you jumped.
 The next step is to find two sturdy, elevated objects several feet from the ground that are closer together than the distance you just jumped. Since you know that you can cover this distance (you just did a longer jump on the ground!), you should be able to quiet that fear enough to give it a shot. Once you get comfortable with that, find a place to practice jumping a slightly longer distance. In time, you’ll be able to jump just as far while up high as you can on the ground, maybe even farther!
I also suggest experimenting with other parkour moves, like vaults to help you overcome your fears. Climbing a tree is another great way to build confidence.
Continue to push back your perceived limitations with consistent practice and in time, you’ll eventually be able to shut out fear and replace it with courage. You might even find that confidence sneaking into other aspects of your life.
Backyard Pull-up Bar Part 2: Back to the Bar
 Last month, my brother Danny and I finally finished building his backyard pull-up bar. It wound up being a bigger project than we originally envisioned, but in the end, Danny was left with an amazing home gym.
I recently got to work out on the backyard bar during a visit to Danny’s house in Brooklyn. I’ve been trying out some advanced muscle-up techniques like plyometric clapping muscle-ups and slow, no-hands muscle-ups (technically the hands are used, but they aren’t gripping the bar), while Danny’s been continuing to practice the human flag and human flag pull-ups.
The bars in Danny’s set-up have a 2″ diameter, which is even thicker than the bars at Tompkins Square Park. The thickness of the bars adds an extra challenge to exercises like pull-ups, muscle-ups and levers, so practicing on Danny’s set-up is helping my grip strength. Training on the fat bars makes going back to standard ones feel easy.
It was a bit cold out but we still managed to heat up those bars!
Grip Training and Antagonistic Balance
 Editor’s Note: This is a guest post by grip expert Jedd Johnson.
You are all probably well on your way toward including proper hand flexion exercises in your program if you are doing the variety of exercises that Al does here on his site.
However, I am willing to bet that almost none of you train the opposing movement patterns. In fact, it’s probably never crossed your mind before now, unless you’ve sustained an injury and done work with a physical therapist.
What is Antagonistic Balance?
The term “antagonistic balance” refers to maintaining a realistic balance of strength between opposing muscle groups.
For example, the shoulder needs to maintain a proper balance between the work and force used in pushing and pulling exercises like push-ups and pull-ups. Without proper antagonistic balance, shoulder problems can occur.
Here are some examples of conditions that can result when there is an imbalance, such as too many pushing movements and not enough pulling movements:
- Poor Posture
- Rounded Back
- Slouched Shoulders
- Neck Pain
- Headaches
- Upper Back Weakness
- Pulled Muscles
- Cramps
- Poor Performance in Sports
- Poor Results in the Strength Training Program
The shoulder, however, is not the reason I am writing today. Instead, I want to talk about your hands.
 Antagonistic Balance and Hand Health
No doubt about it, a lot of the training we do is heavily dependent on grip strength. This is very important to take into consideration. After all, when you are in the middle of “skinning the cat” the last thing you want to have happen is to lose your grip and crack your skull on the pavement.
Just like the health of the shoulder joint, hand health from proper antagonistic balance should be a part of your training. This involves proper balance between flexion and extension movements of the hand and wrist.
Over time, being in a state of antagonistic imbalance can lead to many problems from the elbow down to the fingers.
- Misalignment of Carpal (Wrist) Bones
- Stiff Hands
- Carpal Tunnel Syndrome
- Tingling in the Fingers
- Weakness in the Hands, Fingers and Thumbs
The easiest way to maintain balance between the antagonists of the hands is by including finger and wrist extension movements.
Here are three ways you can include extensor training in your routine without breaking the bank.
 1. Rubber Band Finger Extensions
A good set of rubber bands can be picked up at any office supply store. I like #84 Rubber Bands from Staples.
String them over your fingers and thumb and open your fingers against the resistance. The primary purpose of rubber band work is for endurance, so hit them until your forearm heats up and feels like it might just burn the next person that rubs against it.

2. Protein Container Extensor Training
Protein powder jugs and other similar-shaped containers make for great tools for working the extensors. Just throw some sand, steel shot, or bent steel from nail bending inside and you have a great tool for extensor training.
Stick your fingers and thumb in, open up all the way, and lift the container up off the ground. If you have monstrous hands, you may need something bigger. I use an Utz Cheese Ball container. I’m not sure how it made its way into my house…
3. Sand Bucket
 Take a large bucket and put some sand in it. Dig the fingers down into the sand and open your hand against the resistance. This will work the extensors more intensely than the other two, so be ready for a pump. Call me a wuss, but I can’t stand getting the sand under my finger nails, so I usually wear leather working gloves while I do this. You may like this better as well.
These three methods of training the extensors are very cheap, probably costing you less than $10 in total, but they enable you to hit the extensors under light resistance for lots of reps (rubber bands), isometrically with heavier loads (candy container), and dynamically with heavier loads and fewer repetitions (sand bucket) so you are able to strengthen the extensors and maintain the antagonistic balance that is so important for hand health.
How Often to Do These Movements
Since I compete at grip sport, I do rubber band extensions every single day I train in an effort to maintain my antagonistic balance. Because the resistance is light, you can probably do these multiple times a week as well, probably 3 or 4 times, even.
I will do the sand bucket or the extensor lift once a week and I rotate each week. This frequency is probably good for you as well.
These methods should keep you going in your workouts, enabling you to progress more quickly and stay “in the game” for many years to come.

Jedd Johnson, CSCS has competed in numerous strongman and grip contests and holds the world record for the two hands pinch. Jedd is also a regular speaker & presenter at the Pennsylvania State Strength and Conditioning Clinic.
You can find more of Jedd’s writing on DieselCrew.com and TheGripAuthority.com.
If you’d like to find out more about grip competition, check out GripSport.org, the homepage for the North American Grip Sport Association.
The Rest/Pause Method
 The mind is the most powerful muscle in the body, for without the mind, your physical muscles are useless. The rest/pause method will test the limits of both your body and your mind, while allowing you to push your strength and endurance to new heights.
The rest/pause method involves taking short breaks during a long set in order to get more total reps. Instead of stopping after you reach a pre-determined number of, let’s say, push-ups, just rest at the top with your arms locked out once fatigue sets in. Take a breath or two, then keep pushing out one rep at a time, with several seconds in between reps if need be. This will allow you to push the boundaries of muscular failure.
Incorporataing the Rest/Pause Method
Push-ups are one of the best exercises to use this technique with, but rest/pausing works great with pull-ups, squats and even muscle-ups.
After an intense session using the rest/pause method, it’s important to have a rest day or a recovery workout the following day. Rest/pause workouts are best used as a shocking technique, so they shouldn’t be done more than once or twice a week.
The power of using your mind and taking it one rep at a time can often lead to groundbreaking workouts. The rest pause method recently allowed me to set a new personal best in muscle-ups. Luckily, I was able to get it on film!
Check out my brother Danny rest/pausing his way to an epic set of over 100 push-ups!
Barefoot Running Technique
 By now, most people have heard of the barefoot running movement. You probably even know some wacko at your office whose got a pair of “the feet gloves” or better yet, those Born to Run style huaraches. Maybe you’re even thinking of trying it for yourself. Here are some things to consider before you jump on the barefoot bandwagon.
To Shoe or Not to Shoe
Barefoot running is appealing not only because it taps into our primal caveman instincts, but more importantly, because it encourages forefoot running, which is generally considered the safest, most efficient running technique. Forefoot running lessens joint impact and facilitates a higher stride frequency, which is often correlated with faster race times.
Will Barefoot Running Make You Faster?
Maybe, but probably not. However, barefoot running will help you learn how to run with less impact, which will reduce the likelihood of pain and injuries – at least in the long run (pun intended).
Transitioning to Forefoot Running
While running barefoot or with minimal footwear is a great way to learn the forefoot technique, it isn’t absolutely necessary. Even though I like to run in my Xero Shoes, you can learn to run on your forefoot in any comfortable sneaker (I still like to run in Vans, too).
When making the transition to forefoot running, it is common to experience severe soreness in your calves. This doesn’t mean that you’re doing anything wrong. It just means you’re using muscles that you aren’t used to using. In time, those muscles will become stronger and the soreness following a run will subside.

Keep your knees and ankles bent.
Other than the obvious, there are a few key differences between the forefoot running technique and the heel-to-toe technique.
First, in forefoot running, your foot lands right under your hips instead of in front of your center of gravity. This does not mean that you’re up on the tips of your toes the whole time, but rather that your foot will land almost totally flat, with the heel just barely making contact with the ground. Maintaining good posture while bending your knees and leaning forward from your ankles will help facilitate this.

Kick out the back, Jack!
Another difference with barefoot running technique is that you aim to keep your foot in contact with the ground as briefly as possible. Rather than leaving your foot down there while you roll from heel to toe, in forefoot running, you strike down quickly and move into the next stride immediately.
Whether you choose to wear shoes or not, relax, focus on proper posture and listen to your body to avoid pain. Ease in slowly and gradually, allowing yourself time to adapt.
Advanced Pistol Squatting
The pistol squat is a challenging exercise, but with consistent practice, it can become relatively easy. Once you can do 10 repetitions on each leg, you should try adding a new challenge.
Watch the video to see my top five advanced pistol squat variations that you can do without adding weights.
Scaffold Pull-ups
 Any red-blooded man who’s walked beneath scaffolding has no doubt been tempted to jump up, grab a bar and go for it. Those things are practically begging to be swung around on, hung from or climbed.
One of the only things I dislike about life in NYC is all the construction, but every cloud has a sliver lining. While it can be an eye sore, construction scaffolding is great for doing pull-ups.
My brother Danny and I got a great workout yesterday during the morning commute. While everyone around us scuttled off to the office, we got our reps in without setting foot in a gym.
Watch the video below for more: